How to Post on Instagram for Business: Feed, Reels, and Stories
Written by: Tim Eisenhauer
Last updated:

The easiest way to keep your social media profiles active.
Learn more about Apaya →
How do you post on Instagram for business?
To post on Instagram for business, switch your account to a professional account, then tap the plus button and choose Post, Reel, or Story. From a phone you can publish all three. From a desktop the native Instagram website is stripped down, so the working answer for computer posting is Meta Business Suite at business.facebook.com, which publishes feed posts, Reels, and Stories to Instagram and Facebook from one free calendar. That is the whole mechanic. The rest of this guide is the detail: professional-account setup, every post type on the phone, posting from a computer, and the part the consumer guides skip, which is posting week after week without the feed going dark.
The short version
Apaya does what Hootsuite or Buffer do and adds the part they skip: it writes and designs the posts, carousels, and reels from one brief, then schedules and publishes to your Instagram business account after you approve each one. From $55/mo. The native steps come first, the Apaya walkthrough is further down.
Set your account to a professional account first
Everything a business wants out of Instagram, Insights, a contact button, a category label under your name, and access to desktop scheduling, lives behind a professional account. It is free and takes about a minute.
On the phone: open your profile, tap the menu (the three lines), then Settings and privacy. Find Account type and tools, tap Switch to a professional account, and pick a category. You will be asked to choose Business or Creator. Business fits stores, restaurants, contractors, dentists, and most local companies. Creator fits public figures, coaches, and personal brands. You can switch between the two later, so this is not a one-way door.
If your customers also find you on Facebook, connect the two while you are here. A linked Facebook Page is what unlocks desktop posting and scheduling through Meta Business Suite, and it is required to connect Instagram to most third-party tools. Our guide on linking Instagram to a Facebook Page covers that setup. For the wider picture of what the professional account changes, the Instagram platform overview lays it out.
Post a photo or carousel to your Instagram feed
This is the core feed post, one image or a swipeable set.
- Tap the plus button at the top of the app and choose Post.
- Pick one photo, or tap the multiple-select icon (the stacked squares) to build a carousel of up to 20 photos and videos in the order you tap them.
- Edit each image: filters on the Filter tab, brightness and cropping on Edit. Tap Next.
- Write your caption. Put the point in the first line, because Instagram truncates after a couple of lines and the rest hides behind “more.”
- Add the extras that matter for business: tag your location so you show up in local discovery, tag products or collaborators, and set alt text under Advanced settings for accessibility.
- Drop hashtags in the caption or the first comment. Either works. A handful of relevant tags beats thirty generic ones.
- Tap Share.
Two feed features worth knowing. A carousel is the format for a photo dump, a product lineup, or a step-by-step, and the full mechanics are in our guide to posting multiple photos on Instagram. And to co-author a post that lands on another account’s feed too, add them as a collaborator instead of tagging, which our Instagram collab post guide walks through.
Post a Reel to Instagram
Reels are Instagram’s short video format and the surface that reaches beyond your existing followers.
- Tap the plus button and choose Reel.
- Record in the app, or upload clips you already have. Trim and reorder on the timeline.
- Add audio from the music library, on-screen text, and captions. Text and a clear hook in the first second do most of the work.
- Tap Next, pick a cover frame, write your caption, and tag as needed.
- Share. Your Reel lands on your profile and in the Reels feed.
Keep the first video short and specific. The step-by-step, including cover and audio choices, is in our guide to posting a Reel on Instagram.
Post an Instagram Story
Stories are the full-screen posts that disappear after 24 hours, the low-stakes way to stay visible between feed posts.
- Tap the plus button and choose Story, or swipe right from the feed.
- Capture a photo or video, or upload from your camera roll.
- Add stickers, polls, questions, and a location. On a professional account you can add a link with the link sticker, the main way to send Story viewers to a page.
- Tap Your Story to publish, or Close Friends for a smaller audience.
Stories vanish after a day unless you save them to a Highlight on your profile. Adding a working link is the piece most businesses miss, and we cover it in adding a link to an Instagram post or Story.
Post to Instagram from a computer
Here is the gap every consumer guide skips. If you run your business from a desktop, native Instagram on the web is stripped down: you can publish a basic feed photo, but Reels, scheduling, and most business tools are not there.
The real desktop answer is Meta Business Suite at business.facebook.com, free, and built for exactly this.
- Open Business Suite and pick your business at the top.
- Click Create post, or use Create reel or Create story.
- Check Instagram, and Facebook too if you want both at once.
- Upload your media, write the caption, and preview how it looks per platform.
- Click Publish to post now, or Schedule to set a date and time and manage it all from the Planner calendar.
That last step is where posting stops being a daily chore. Rather than restate the whole method here, our Instagram scheduling guide covers planning posts ahead in depth, and the best times to post on Instagram covers when to slot them.
Business Suite fixes the timing. What it does not fix is the part that eats the hours: writing every caption and designing every graphic before there is anything to schedule. That is the work, and it is where consistency dies when the week gets busy.
The same job in Apaya, with screenshots
Meta Business Suite and schedulers like Hootsuite or Buffer organize content you have already made. Apaya adds a content production layer on top: it makes the posts, then schedules and publishes them. Here is the same posting job, start to finish, from a live account.
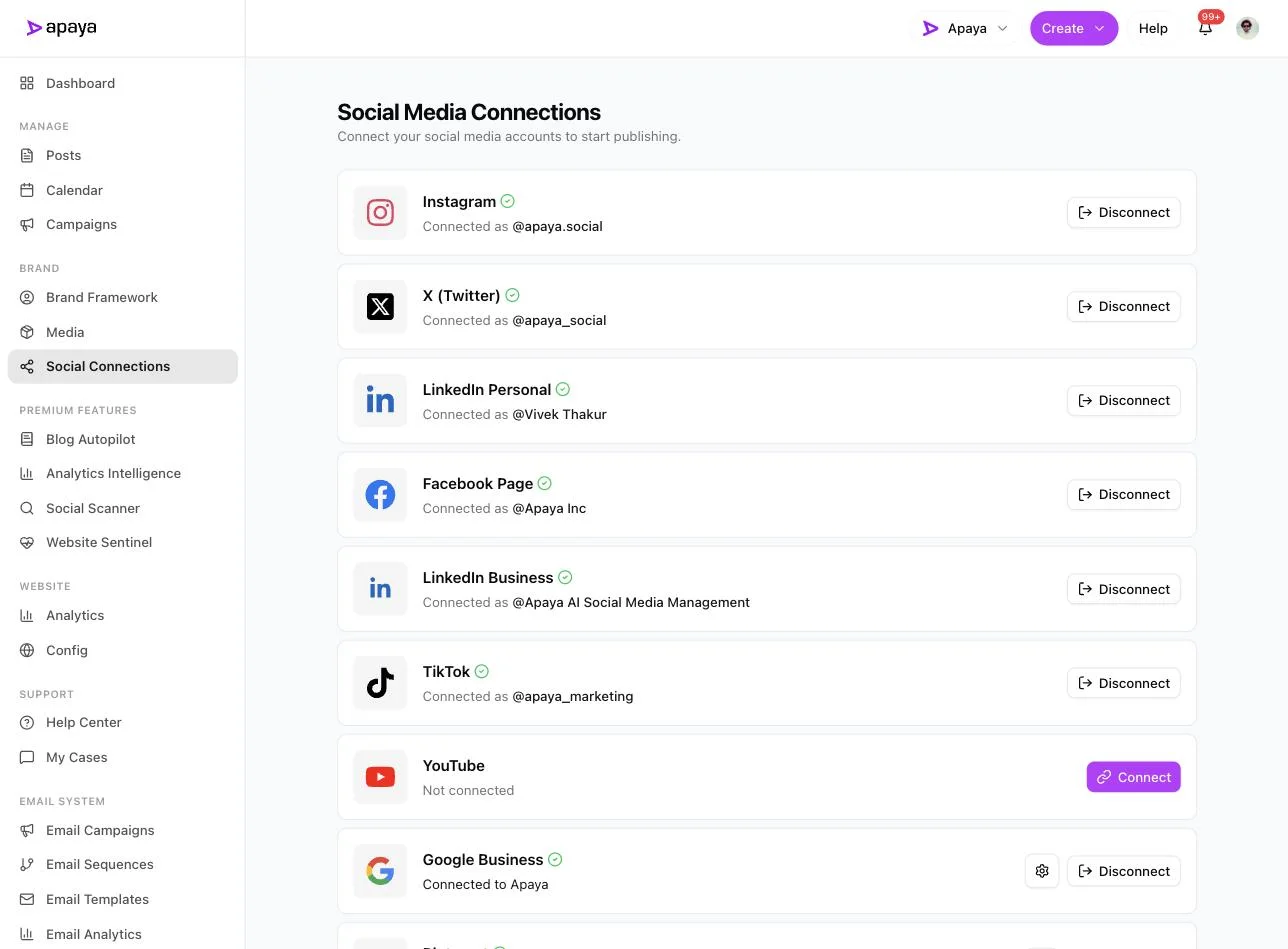
1. Connect your Instagram business account. On the Social Media Connections screen you sign in through Meta and link your accounts. To connect a Facebook Page, and the Instagram business account tied to it, you have to be an admin of that Page on Meta’s side. That is a Meta permission, separate from any role inside Apaya.
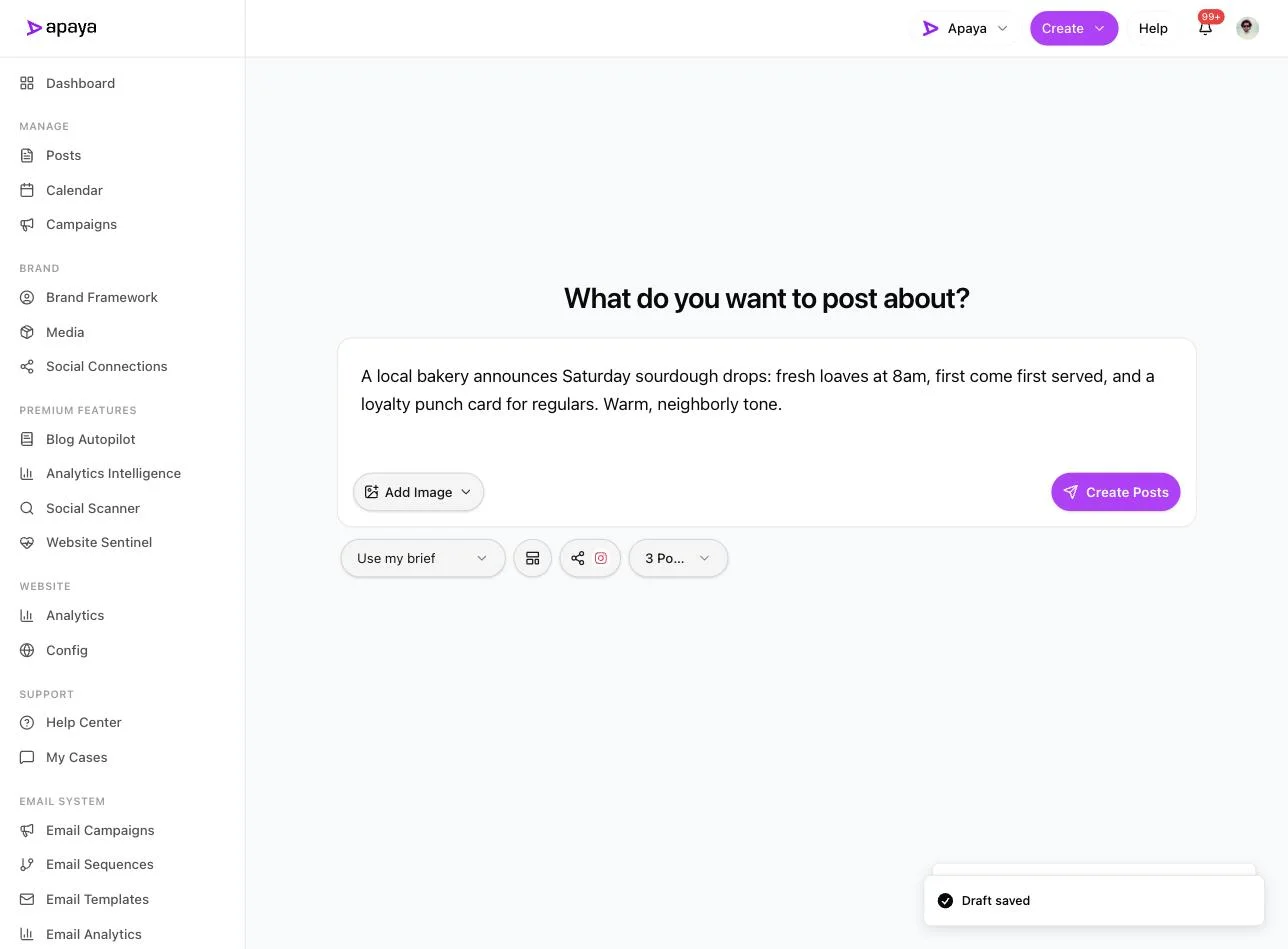
2. Write a one-line brief. From Create, tell it what to post about in plain language, choose how many posts you want, and pick Instagram. No blank canvas, no Canva.
3. Review the drafts and approve. A minute later you get finished Instagram posts back: written captions and a designed graphic for each. Keep, edit, or discard any of them, then Save as Drafts or Approve and Schedule. Nothing publishes without your sign-off. If you would rather feed the brief with ideas, our what to post on Instagram list is built to be pasted straight in.
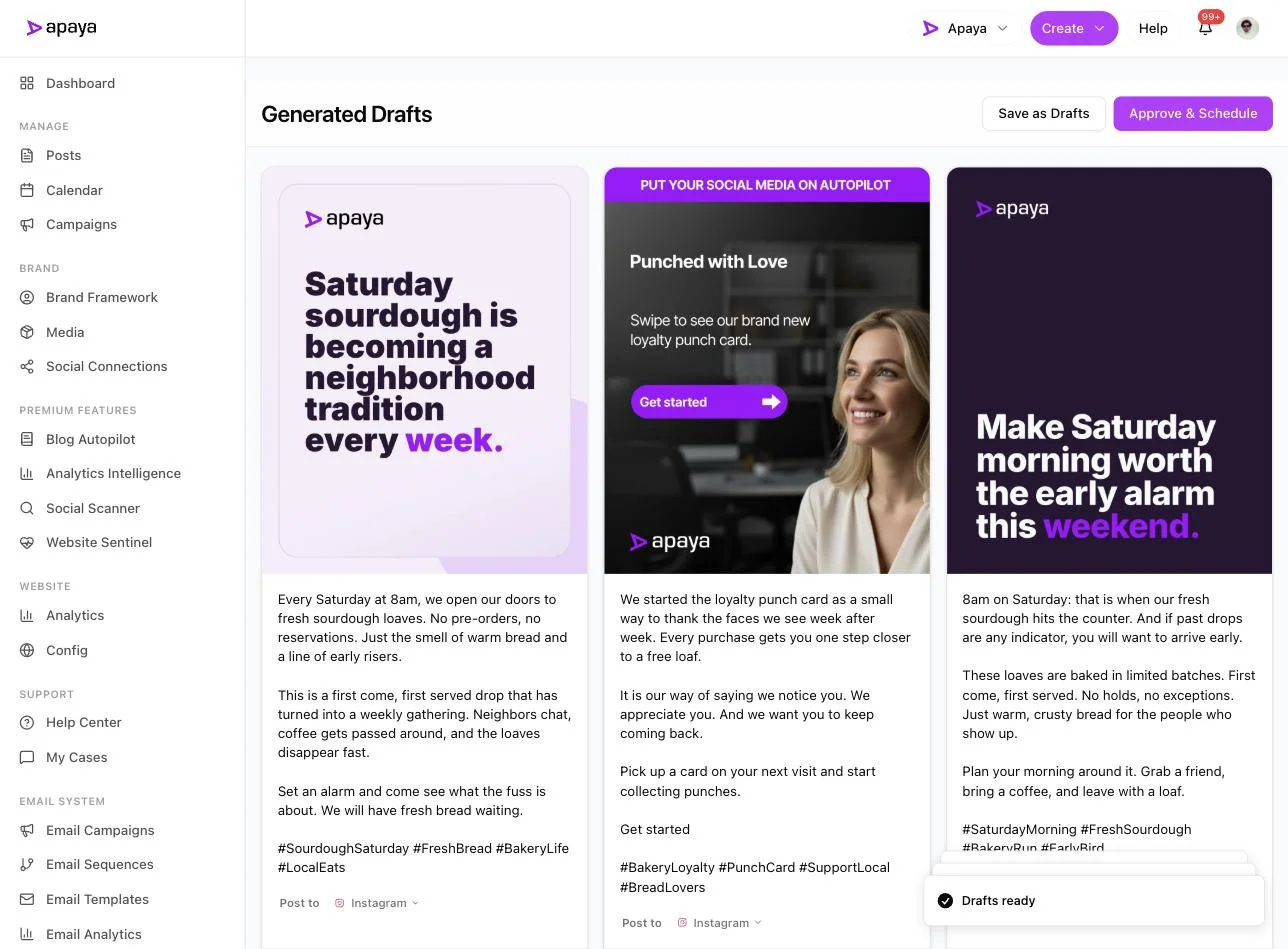
Carousels and Reels run the same way. The Create menu has a Create carousel mode and a Create reel mode, each taking a brief and returning a finished draft with Instagram selectable as the destination, so the swipeable set and the short video are the same one-line-in, reviewed-draft-out flow as the feed post.
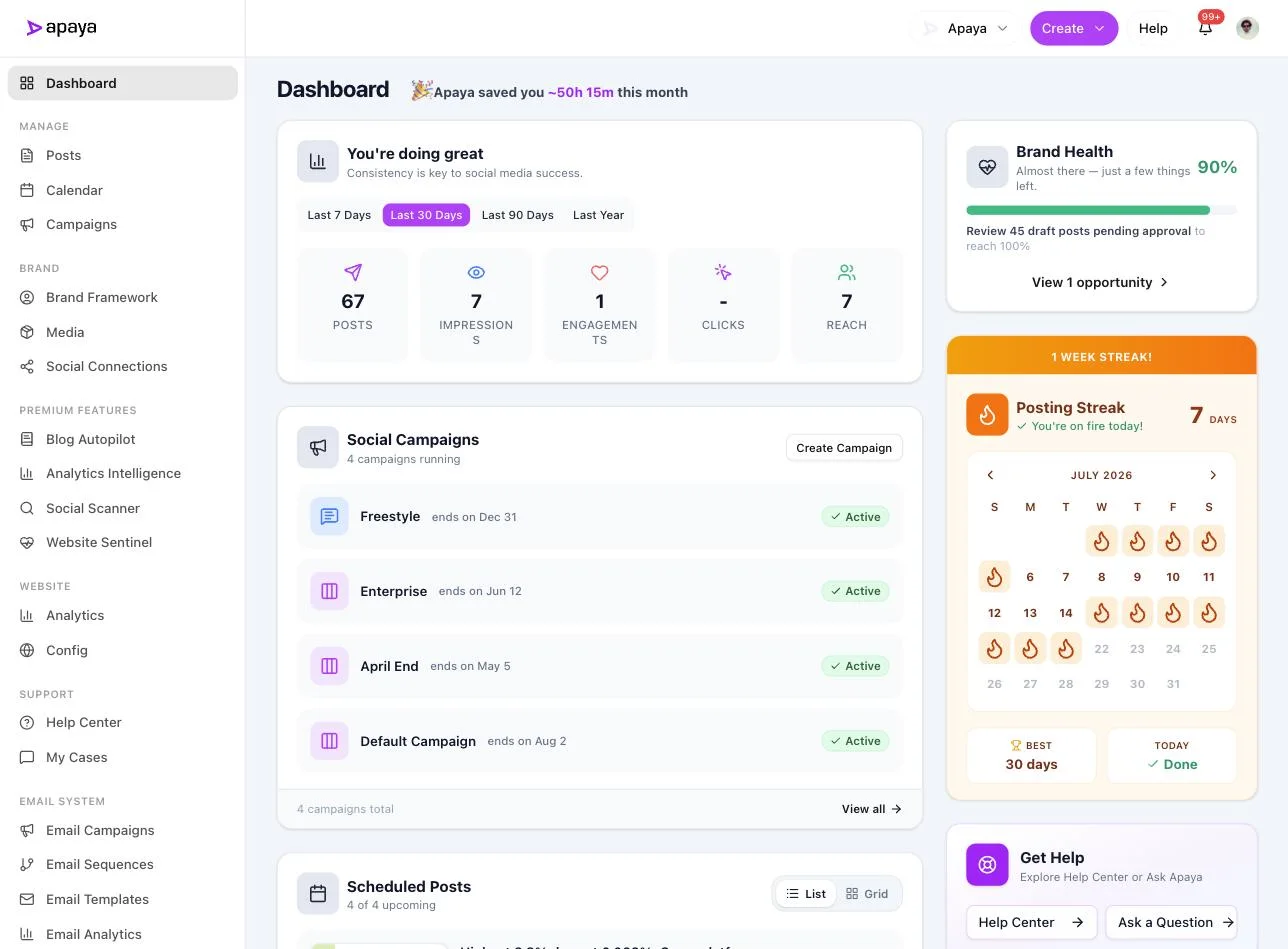
4. Watch the streak instead of the blank feed. Once posts are approved, the dashboard is where you see the month adding up: time saved, a posting streak, brand health, and what is scheduled next.
For the fuller automation picture, from brand voice to the review queue, see AI Instagram automation.
What Apaya adds that a scheduler does not
Here is the positioning in one line: Apaya does what Hootsuite or Buffer do, plus a content production layer. A scheduler organizes content you still have to make. Apaya also makes it, posts, carousels, and reels, from one brief.
What that changes for a business posting on Instagram:
-
The empty calendar problem goes away. A scheduler hands you a calendar with nothing in it. The queue is hungry every week, and an empty queue posts nothing. Apaya fills the queue from a brief, so “what do I post” turns into “here are this week’s drafts, approve them.”
-
The work you get back is the making, not the scheduling. Writing captions and designing graphics is the 8 to 15 hours a month that kills consistency when the business gets busy. Timing was never the expensive part. Producing the content is.
-
Consistency you can hold. The feed-goes-dark problem happens because production stalls, not because scheduling is hard. When the posts are made for you and waiting for approval, staying consistent for months stops depending on finding a free evening.
-
You still own every post. Approve, edit, or discard before anything goes out. The approval step is on by default, so the account posts on a schedule while you keep the final say.
One thing I will not tell you: that automating your posts will grow your following or lift your reach. Nobody can promise that, and anyone who does is selling. What Apaya changes is the time and the consistency, the hours you spend making posts and whether the feed keeps going when the week falls apart. Reach is Instagram’s call. Showing up every week is yours.
Frequently asked questions
How do you switch to an Instagram business account?
Open your profile, tap the menu, then Settings and privacy. Under Account type and tools, choose Switch to a professional account, pick a category, and select Business. It is free, takes about a minute, and you can switch back or over to Creator later. The switch turns on Insights, the contact button, and access to Meta Business Suite for desktop posting.
Can you post on Instagram from a computer?
Yes. The native Instagram website now lets you publish a basic feed photo, but Reels, scheduling, and most business tools are missing. For a full desktop workflow, use Meta Business Suite at business.facebook.com, which publishes feed posts, Reels, and Stories to Instagram and Facebook and lets you schedule them on a calendar, for free.
What is the difference between a business and a creator account on Instagram?
Both are professional accounts with Insights and desktop access. Business is built for companies, stores, and local services, with contact buttons and category labels. Creator is tuned for public figures, influencers, and personal brands, with more granular follower analytics. Most local and product businesses want Business. You can switch between them without losing your posts.
How many photos can you post in one Instagram post?
Up to 20 photos and videos in a single carousel post, shown in the order you select them. Viewers swipe through, and you write one caption for the whole set. It is the format for a product lineup, an event recap, or a step-by-step. Full details are in our guide to posting multiple photos on Instagram.
How often should a business post on Instagram?
Pick a cadence you can hold for months, not a burst you abandon in week two. A few feed posts a week plus Stories in between is a workable baseline for most businesses. The number that matters is the one you keep, which is why consistency, not volume, is the point. See the best times to post and our scheduling guide for planning the calendar.
Related Instagram guides
- How to schedule Instagram posts: plan and queue posts ahead, free and paid methods.
- What to post on Instagram: content ideas for when the brief is blank.
- Best time to post on Instagram: when to slot your posts.
- How to post from Facebook to Instagram: cross-posting the Meta pair.
- AI Instagram automation: the full brief-to-published workflow.
- How to post a Reel on Instagram and posting multiple photos on Instagram: the two post types, in depth.
Sources
- Instagram professional-account and posting flows, verified in-product July 2026
- Meta Business Suite posting and scheduling, verified in-product July 2026
- Apaya product screenshots captured live from my.apaya.com, July 2026
The easiest way to keep your social media profiles active.
Apaya writes the posts, designs the graphics, and publishes them for you. You approve.
See how Apaya worksThe easiest way to keep your social media profiles active.
Apaya writes your posts, designs your graphics, and publishes everywhere — automatically.