How to Post a Reel on Instagram: Step by Step for Businesses
Written by: Tim Eisenhauer
Last updated:

The easiest way to keep your social media profiles active.
Learn more about Apaya →
How do you post a reel on Instagram?
Open the Instagram app, tap the plus button at the top, and choose Reel. Record clips or upload video you already have, add audio, trim, and set a cover frame. Tap Next, write your caption, add hashtags and tags, then tap Share. Your reel posts to your profile and the Reels tab. That is the phone method most guides stop at. This one also covers the two things a business owner keeps searching for: how to post a reel from a computer, and how to post one without being on camera. Then it shows how to batch a month of reels from a single brief instead of filming them one at a time.
The short version for businesses
Apaya makes the reel for you: describe the topic, it builds the video from a template, and you review before it schedules or posts to Instagram. No filming, done from your desk, a month at a time. From $55/mo. The full walkthrough is below.
Post a reel from the Instagram app, step by step
Instagram moves these buttons every few updates, so a label may sit a little differently than it does here, but the flow has held steady for a while.
-
Open the composer. Tap the plus icon at the top of the app, then choose Reel. You can also swipe right from the feed to open the camera and pick Reel at the bottom.
-
Record or upload. Hold the capture button to film a clip, or tap the gallery thumbnail in the lower corner to upload video already on your phone. Uploading is the path most businesses want: product footage, a screen recording, b-roll, or a clip you shot earlier all work, and none of them put you on camera in the moment.
-
Trim and arrange your clips. Instagram drops you into the clip editor. Trim each clip, drag to reorder, and adjust length. Reels run longer than a feed video, and Instagram has changed the maximum a few times, so the composer shows your current limit as you trim.
-
Add audio. Tap the music note to add a track. Professional and business accounts see a business-safe music catalog rather than the full trending-song library, so if a popular track looks unavailable, that licensing limit is why. Original audio and the business-cleared tracks both work.
-
Add text, stickers, and effects. Layer on-screen captions, stickers, a voiceover, or filters, and time the text to land with the clips. On-screen captions matter because many people watch reels with the sound off.
-
Tap Next to reach the details screen. This is where the reel gets its caption and metadata.
-
Write the caption and add tags. Write the caption, add hashtags, tag people or a collaborator, and add a location. For a business, the caption is where the call to action goes, so do not leave it blank.
-
Set the cover. Tap Cover, then pick a frame from the video or upload an image as the thumbnail. This is the frame that shows in your profile grid, so choose one that reads clearly at small size.
-
Decide whether it shares to Facebook. If your Instagram is connected to a Facebook Page, you will see an option to also share the reel to Facebook. If that toggle is missing or greyed out, your accounts are not linked yet. Our guides on linking Instagram to a Facebook Page and posting from Facebook to Instagram cover the fix.
-
Tap Share. The reel publishes to your profile and the Reels tab.
If you want the reel to go out later instead of now, professional accounts can schedule it before sharing: on the details screen, open Advanced settings and choose a date and time up to 75 days out. Scheduling and the business music catalog both need a professional account, and posting on an Instagram business account walks through the switch if you are still on a personal profile. For the desktop and free routes, every Instagram scheduling method compared lays them out, and the best times to post on Instagram helps you line the timing up with when your audience is on.
Post a reel on Instagram from a computer
Businesses work at a desk, and Instagram lets you post a reel without picking up your phone, within limits.
-
instagram.com in a browser. Log in, click Create in the left sidebar, and select your video file. Instagram treats a vertical video as a reel. You can write the caption, add a cover, tag, and set a location from the browser composer.
-
Meta Business Suite. business.facebook.com lets you create and schedule reels for Instagram from desktop, alongside Facebook, on a calendar.
The catch with both: the desktop editors are thinner than the app. Fewer editing tools, limited audio, and no in-browser recording. So the pattern most businesses land on is to export the finished vertical video, then upload it from the computer to write the caption and schedule. If your whole reason for going to desktop is to avoid the phone-first, film-yourself workflow, that is a sign the production step is the real bottleneck, which the next two sections are about.
Post a reel without being on camera
You do not have to appear in a reel, and you do not have to film anything live. Three no-camera routes, from most manual to least:
-
Upload existing footage. Product shots, screen recordings, b-roll, event clips, or stock video. Instagram accepts uploaded video in the same reel composer, so you assemble a reel from clips you already have.
-
Build it from stills and text. A reel can be images plus on-screen text set to audio. Slideshow-style reels count as reels and need zero filming.
-
Generate the video. Tools built for this turn a topic into a finished vertical video with beat-synced text, so there is no camera and no editing timeline at all. That is the route in the next section.
For what these reels should say, our running list of what to post on Instagram works as briefs, and the Instagram benchmark breakdown has the data on how reels compare to carousels and feed posts if you are deciding where to spend the effort.
The same job in Apaya
Everything above is the manual version: you film or source the video, edit it, write the caption, and post. Apaya does what a scheduler like Hootsuite or Buffer does, and adds the part they leave to you: it makes the reel. Here is the flow, captured from a live account.
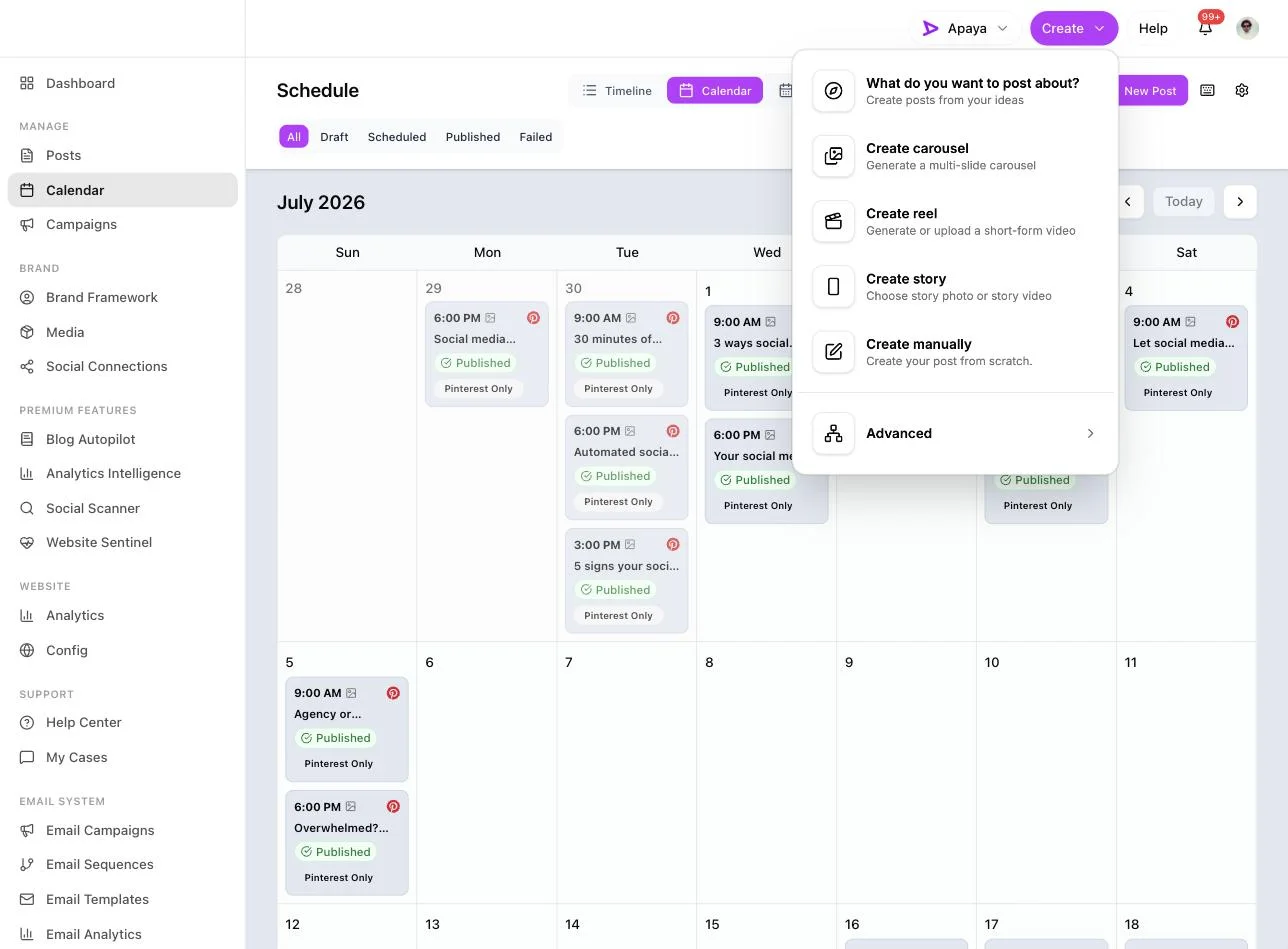
1. Open Create and choose Create reel. From any screen, the Create menu asks what you want to post about and lists the formats, including reels, carousels, stories, and manual posts.
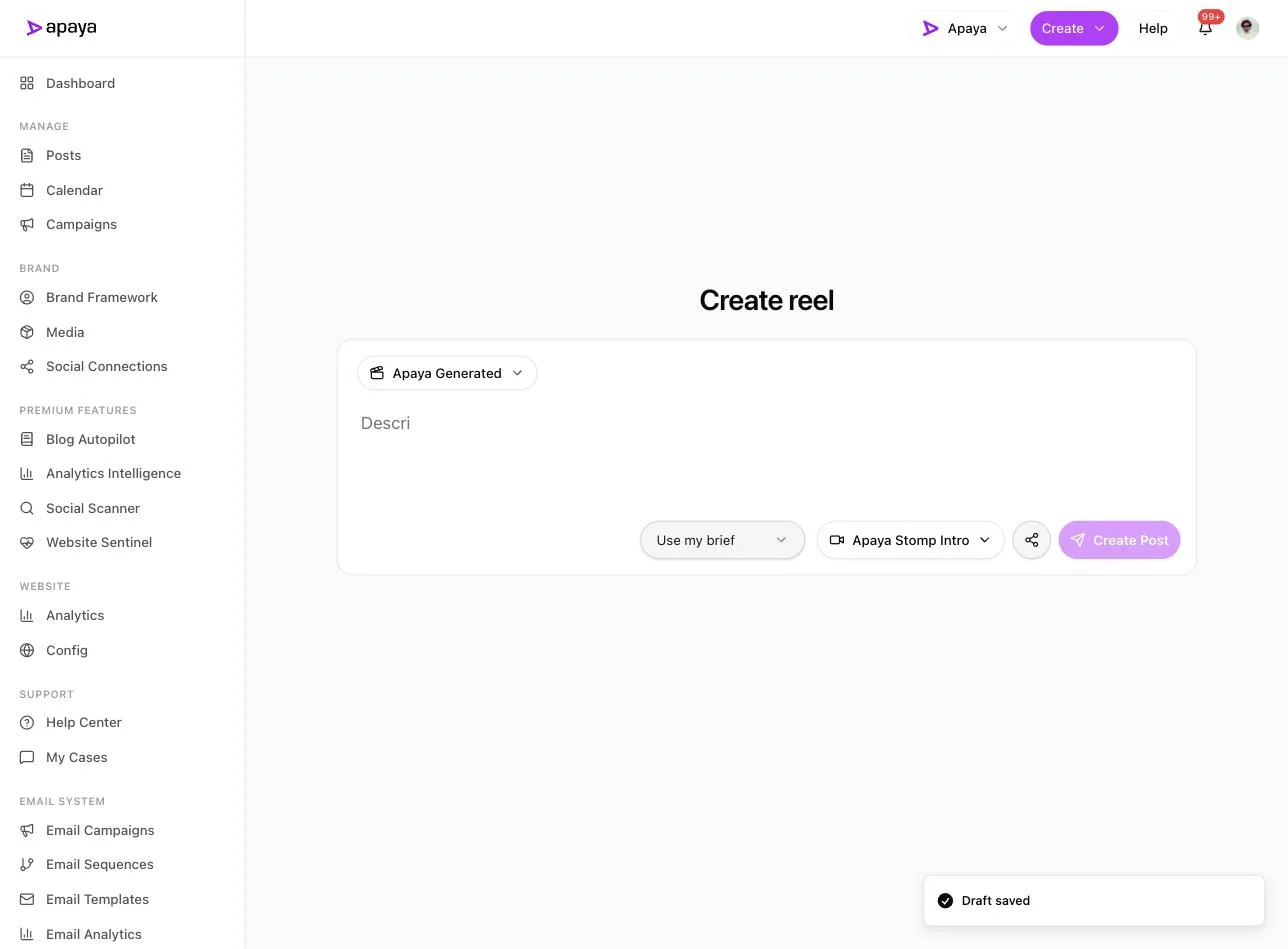
2. Start the reel composer. Reel mode opens with the video source set to Apaya Generated, a brief box, and a video template selector. Generated source is the no-camera part: you are not uploading footage or filming anything, the video gets built for you.
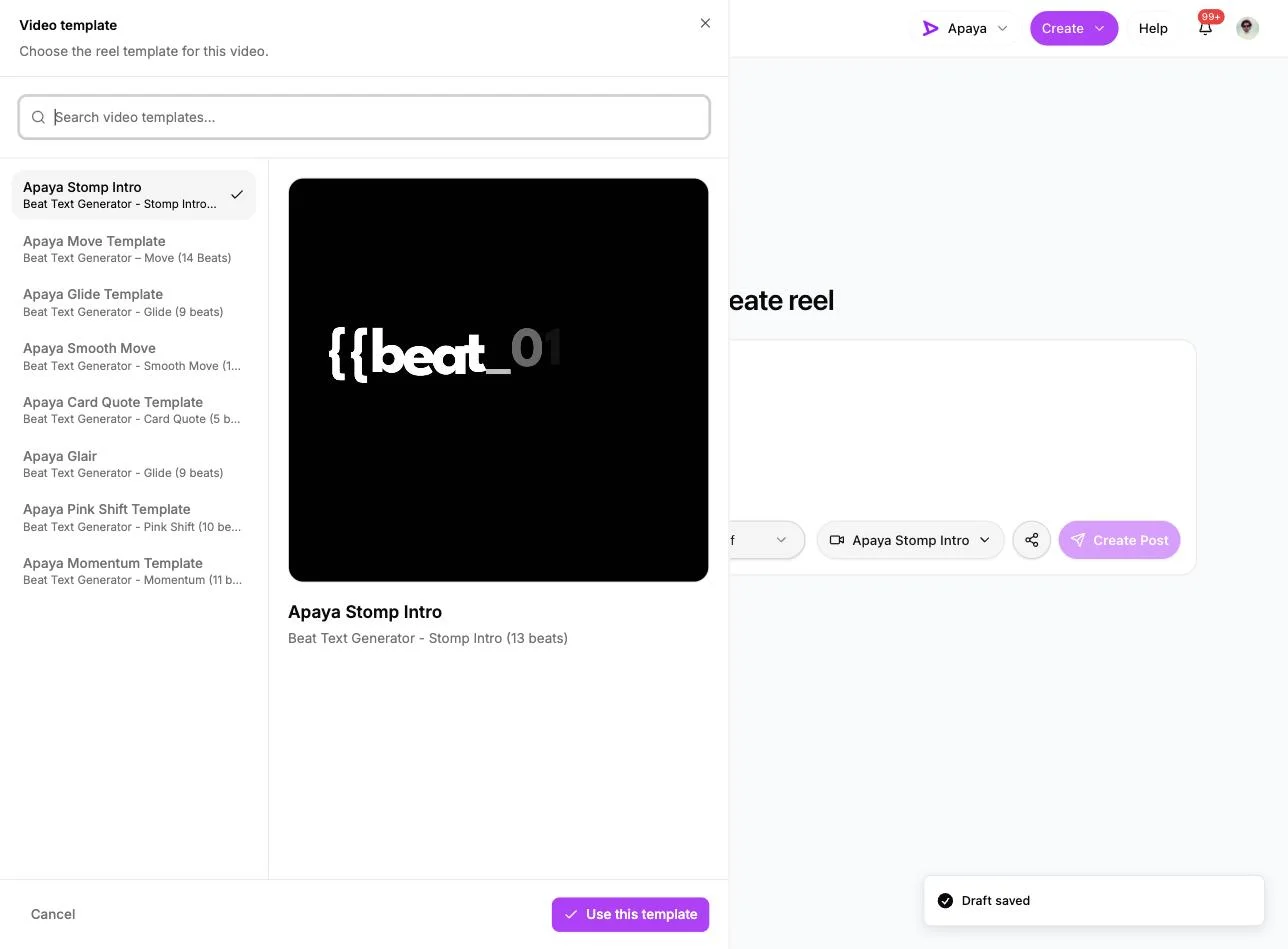
3. Pick a video template. The template picker is a set of beat-synced text templates with names like Stomp Intro, Move, Glide, and Card Quote, each showing its beat count. The template sets the rhythm and motion, so you never open an editing timeline.
4. Write the brief and choose Instagram. Type a plain-language brief, then open the platform picker and select Instagram. The same reel can go to more than one place: the picker lists Instagram, X, LinkedIn, Facebook, and TikTok. Here the brief is a set of desk stretches.
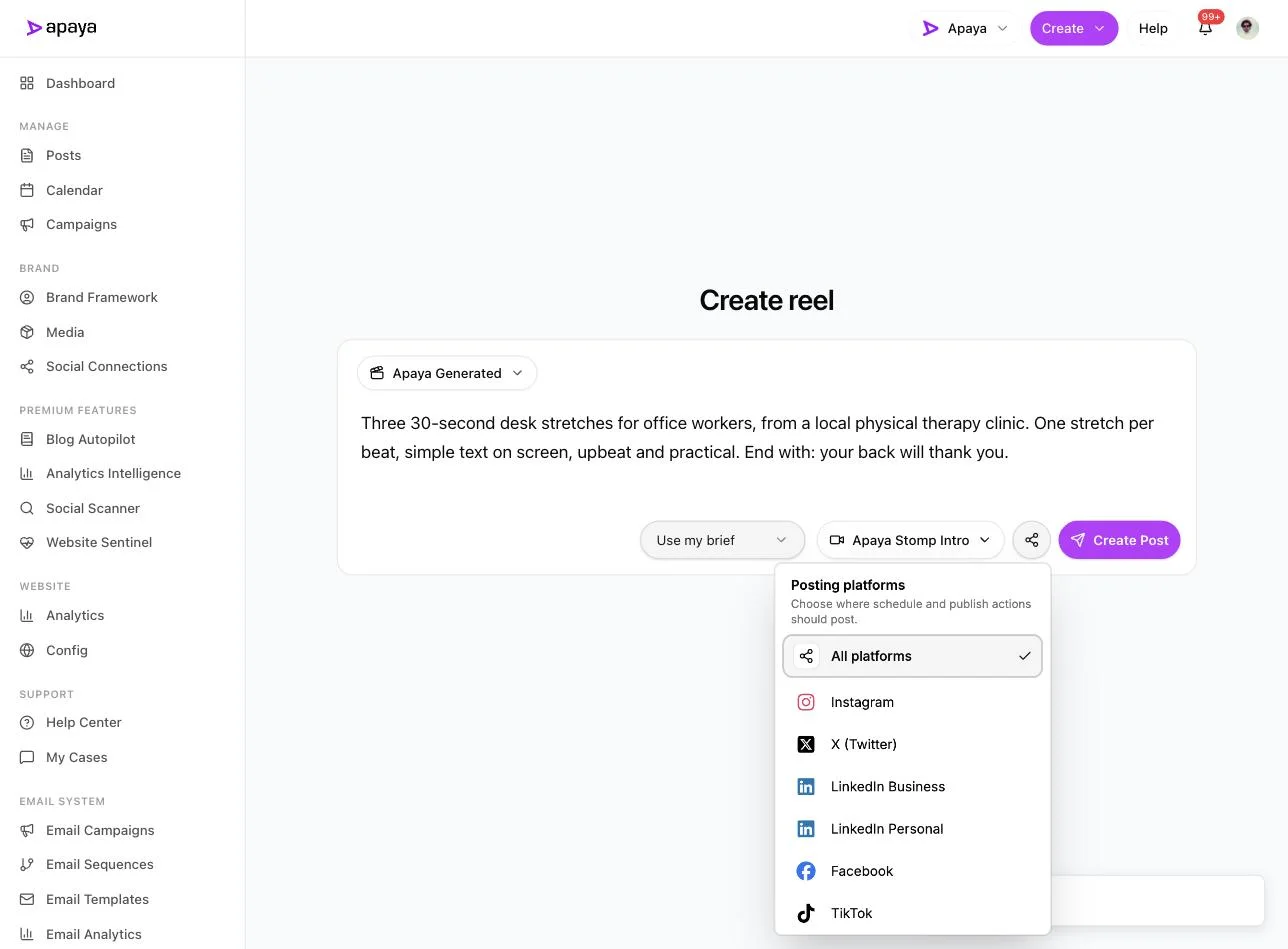
5. Create, review, then schedule or post. Click Create Post. Apaya writes the reel beats, sets the video to the template rhythm, renders the video, and saves a draft for you to review. Nothing goes out until you approve it, and from the draft you save it or send it to the schedule. If you want reels published on a repeating cadence without opening the app each time, that runs through Apaya’s Instagram automation.
One prerequisite worth stating: to publish to your accounts, you connect them to Apaya first. Instagram connects as a professional account, and you can see how it handles the platform on the Instagram platform overview. To connect a Facebook Page, you have to be an admin of that Page, since that permission lives in Facebook, not in Apaya. Apaya’s own roles are a separate system from Facebook Page roles, so being set up inside Apaya does not grant you access to a Page you do not already administer.
What Apaya adds that a scheduler does not
Schedulers organize content you still have to make. Point one at an empty week and it schedules nothing, because there is nothing there. The reel still has to get filmed, edited, and captioned by you. Apaya adds a production layer on top of the scheduling: from one brief it builds the reel, writes the caption, and renders the video, then schedules and publishes it after you approve. It makes your carousels, feed posts, and stories the same way. A scheduler like Hootsuite or Buffer holds the reel. It does not make the reel.
For reels, that changes the math in four ways, all of them about time and consistency:
-
Batch a month in one sitting. Instead of filming one reel at a time, you write a handful of briefs back to back and get a stack of drafts to review. The bottleneck stops being the camera.
-
Work from your computer. The whole flow is desktop, from brief to review to schedule, which is where most business owners are during the workday.
-
No on-camera pressure. Generated video means the reel exists without you filming yourself, which is the most common reason a business never starts posting reels at all.
-
A cadence you can keep. Reels sit on the schedule and publish on their own, so a slow week at the business does not turn into a dead month on the feed.
Notice what is not on that list. I am not promising a reel will go viral or hit a reach number. No tool controls that. What a production layer controls is whether the reels get made and posted at all, week after week, which is the part that was stopping you. For the deeper look at doing this by hand versus letting it run, see AI versus manual Instagram scheduling, and if you want the piece that only generates captions and posts without the video, the Instagram post generator covers that.
Instagram reel FAQ
How do you post a reel on Instagram?
Tap the plus button in the app, choose Reel, record or upload your video, add audio and trim, tap Next, then write the caption, set a cover, and tap Share. On a professional account you can schedule it instead under Advanced settings. The reel lands on your profile and in the Reels tab.
Can you post a reel on Instagram from a computer?
Yes. Log in at instagram.com, click Create, and upload a vertical video, or use Meta Business Suite to create and schedule reels from desktop. Both desktop editors are lighter than the app, with fewer editing tools and limited audio, so most businesses upload a finished video from the computer rather than build the reel there.
How do you post a reel without being on camera?
Upload footage you already have, build the reel from stills and on-screen text, or generate the video from a topic. Instagram never requires you to appear on camera. Uploaded b-roll, product clips, and generated video all post as normal reels, so the film-yourself version is a habit, not a rule.
How do I share a reel to Facebook?
Connect your Instagram to a Facebook Page first, then use the share-to-Facebook option on the reel details screen. If the toggle is missing, the accounts are not linked. Connecting a Page in any publishing tool requires you to be an admin of that Page, because that permission lives in Facebook. See linking Instagram to a Facebook Page and posting from Facebook to Instagram.
Can you schedule Instagram reels ahead of time?
Yes, three ways: in the app on a professional account up to 75 days out under Advanced settings, free on desktop in Meta Business Suite, or through an AI flow that creates the reel and schedules it in the same sitting. Batching two to four weeks of reels in one session is the pattern that keeps a feed alive without a daily scramble.
Related Instagram guides
- What to post on Instagram: reel ideas that double as briefs.
- How to schedule Instagram posts: every scheduling method compared.
- Best time to post on Instagram: when to slot the reel.
- Instagram automation: posting on a set cadence.
- The Instagram platform overview: how Apaya handles Instagram.
Sources
- Instagram Reels creation and scheduling flow, verified in-app July 2026
- Meta Business Suite reels scheduling, verified in-product July 2026
- Apaya product screenshots captured live from my.apaya.com, July 2026
The easiest way to keep your social media profiles active.
Apaya writes the posts, designs the graphics, and publishes them for you. You approve.
See how Apaya worksThe easiest way to keep your social media profiles active.
Apaya writes your posts, designs your graphics, and publishes everywhere — automatically.